

Friday, January 15, 2016
The big news!
I know the last post made you wonder did I throw away everything?? Am I a new minimalist? Did the life-changing book "the magic of tidying up" make it possible for these photos. No, we are moving!!! I spent the last 5 years making my first home with hubby and baby bear but, we outgrew it. I really want more children and hubby decided it was truly time to sell his first home. He bought this three years before we met and it is a part of who he is and has been there for him it took a long time to decide to sell. When he was ready everything fell together, timing is everything. So our house went on the market today. We have already found out forever home! We close in late Feb. 2016 and are excited to start a new project it may take years. We are going from 1300 sq ft to 3400 sq ft wow! We definitely do not have furniture for so many spaces but, we are excited that it means shopping and decorating. We bought a classic colonial and it is in an adorable neighborhood. Belle my 4 year old said, "Oh mommy I love the neighborhood"...Not exactly what I thought she'd say, by it is really awesome.
House wrap up!


The kitchen is finalized we did laminate, I painted the old outdated wood white and added mitered wood trim and oil rubbed bronze knobs. Throughout the house we had flat paneled doors and we upgraded to the standard 6 panel wood grain white.


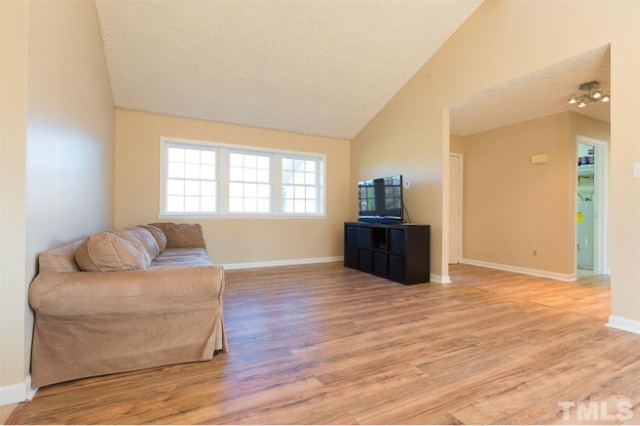


We painted every room "kiln beige" and it really made the house pop.

Wednesday, July 15, 2015
Summer living
I am a summer-a-holic! If you are one you get it. If you aren't here is what it is...Summer-a-holic (Noun) a person who can only function at temperatures above 80 degree F. A person who needs copious amounts of sunlight, and becomes a lay about in such climates.
Here is the long and short of it. Spring ushered in a need to define, and redo my space. Summer however made me an extremely lazy DIY girl. I have taken 4 Vacations, and countless weekends since my last update. The kitchen has come to a complete stand still. I am planning on installing my floors this evening, although last week I had tried and failed miserably between my 14 year old summer house guest and my 3 year old, I threw in the towel.
I have been unable to spray my cabinets as the weather has been consistently in the 90's or raining. I have a million excuses and I am sick of each one. The project has overwhelmed me and if I did not own up to it on the blog, I would feel as if I was being dishonest. DIY plans are hard, and I understand when to hire a professional?! I have one coming to do some work next week!
Long story short stay tuned.
Friday, June 12, 2015
It's been a while
I underestimated how long it would take to redo my kitchen. Goodness painting and installing new backsplash alone took forever. The cabinets are sill being mitered and we are still cooking and cleaning which is utter chaos. I am not sure a resurface should have been attempted we have very cheap 1980's cabinetry. It did save us a bundle but, had I doubled my budget from 1k to 2k we would have been able to buy and install new cabinets.
I digress we are almost done and hubby had to completely make two new drawers. He is pretty crafty! 
 How I spent my morning...blocking out where to put the silverware and various other things in every drawer you will see a very open area to the left. I have decided I am tired of so much clutter on the cabinet tops. Right now we had butcher block, coffee maker, coffee cups, utilize in caddy, toaster, and miscellaneous spices.
 Stay tuned!!!

I asked him to combine two small drawers into one huge drawer. We decided to add new dividers that were customized to our kitchen needs.
That is all going to change phase 1 was to make a microwave/coffee bar.
The 2nd phase is adding a butcher block build in to the silver wear drawer.
Sunday, May 31, 2015
We have made contac
Contac paper a medium I have not worked with. I finally contac paper that was my style. Well my style as much as contac paper. Growing up my mom lined our shelves with dinning mats. I never felt the need to line prior shelves in new homes, or apartments. When I moved in with the husband our shelves were lined it was not attractive. Since they cleaned up easy enough I loved with the contac paper. How I have not a clue. So we are re-finishing the cabinets and the old contac paper was removed and lo and behold our cabinets looked sad. I decided to take a trip to Target and pick up two rolls of black and white frilly paper actually it looks almost like my table cover.  It's like Yankee camoflauge.
  The installation was terrible it stinks. I am very sensitive to smells and this one was very strong. It stuck to itself, me and not really my cabinet. After 30 minutes 3 cabinets were complete and I had to take a break the drawers can wait.
It's like Yankee camoflauge. The installation was terrible it stinks. I am very sensitive to smells and this one was very strong. It stuck to itself, me and not really my cabinet. After 30 minutes 3 cabinets were complete and I had to take a break the drawers can wait. Kitchen Chronicals part duex
The cabinets are made from MDF aka partical board. The laminate countertops have seen better days and need to updated. We have all black appliances not my choice but hubby has replaced half when I met him so I am going with it. We have now replaced all of the appliances.
I dream of a bright white kitchen. I like the idea of composit black sinks, new black multi colored countertops, ideally we would get cabinets.
I started pricing new cabinets and we were looking to add on the adjacent wall a workspace and cabinets. The other wall measures 6ft with a corner and additional wall 5ft it was meant to be an eat in kitchen although, I need the workspace as we have very little prep space.
I I priced my dream and it was the upper 3k and that was with out floors. Our budget is $1,000. Well that is how the cookie crumbles.
Off to pin test we go. I found a great cheap inspirational kitchen. http://sandandsisal.com/2013/09/budget-cabinet-makeover.html
It looks amazing and right up my alley. Hubby and I did not use any wood glue as we have a nail gun and plenty of putty, and time. My complete shopping list for wallpaper, nails, primer, paint, deglosser, cleaner, molding etc. was $128. That will do just the cabinet makeover. I used crown molding in 15ft bars for .51 cents a ft. It came to $38.
Here is what we did.
 I putty redid the doors as I loath the detail work from the 80's it is about 31 years dead.
I love sparkle and putty it is soothing and sort of like playing with play dough. 
Adding the goopy white wallpaper I found for $15 at Home Depot covers 56 sq ft!!


I wouldn't purchase it again. 
 Hardware eh I was going to clean and spray but they cleaned up and we're still so worn I decided to buy new for about $50 I will get into that another time.
After primer 2 coats of exterior/interior Sherwin Williams reflective white semi-gloss. Really fantastic *roll on do not brush it will be ugly.
That is when hubby and his miter saw entered 
That is pre puttied after trim was added no paint yet! We used an 18 gage brad nailer with 5/8 to place so easy and not messy. 


The kitchen chronicles
The kitchen update on a budget has started!!


This is what we were working with eek-
I know everyone just gasped it is ugly, and cheaply made 1980's tastic style
Subscribe to:
Posts (Atom)